Club Med Bintan Island Resort Stay 2015

Our first stay at a Club Med Resort, and it's at Bintan Island!

Staycation at Orchard Hotel 2015

We had our Valentine's Day with a staycation at Orchard Hotel. It was pure indulgence as we enjoyed the various amenities the hotel had to offer with a night's stay in the Signature Suite.

Taiwan Trip 2015

The trip we had been waiting for. One of the last few places in Asia we had to visit. And of course, the food!

Hanoi and Ha Long Bay Trip 2014

Vietnam is famous for Ha Long Bay. This UNESCO World Heritage Site was well worth a visit. And Hanoi is another interesting city famous for its various food and attractions.

Hong Kong Trip 2014

We visited Hong Kong again. This time we visited Victoria Peak during the day. The view during the day was as magnificent as during night-time.

South Korea Trip 2014

Our trip to South Korea in February 2014 was a memorable and exciting journey filled with jaw-dropping scenery and lots of mouth-watering Korean food.

Japan Trip 2013

One of the best trips so far had to be the trip to Japan in 2014! A memorable trip looking at the different landscapes, cultures, cities, food and everything else that Japan had to offer.

Bangkok Trip 2012

Lots of shopping and good food sums up our trip to Bangkok.

Showing posts with label Kyoto. Show all posts

Saturday, June 8, 2013

Travel Blog: Japan Trip 2013 Day 7 - Kyoto, 日本之旅第七天 - 京都, 8 Jun 13

日本之旅第七天:6月8日2013年, 星期六 - 京都
Japan Trip Day 7: 8 June 2013, Saturday - Kyoto
日本の旅行第七日:6月8日2013年(土曜日) - 京都

Day 7 was a day of historical sites exploration. That was because we were visiting Kyoto, the former imperial capital of Japan. But first, breakfast! From the goodies we bought from Life Supermarket on the previous day, we had fresh milk, some pies and pastries. We always enjoy visiting supermarkets in Japan, whether it's a 24-hour convenience store or a huge supermarket like Life. They always have tonnes of goodies which you won't be able to find in their cousins in Singapore.

All these for three people.

Next, it's time to travel to Kyoto. We had to transit at Yodoyabashi Station and the whole trip costs 590 yen per pax and took about an hour.

Kyoto, here we come!

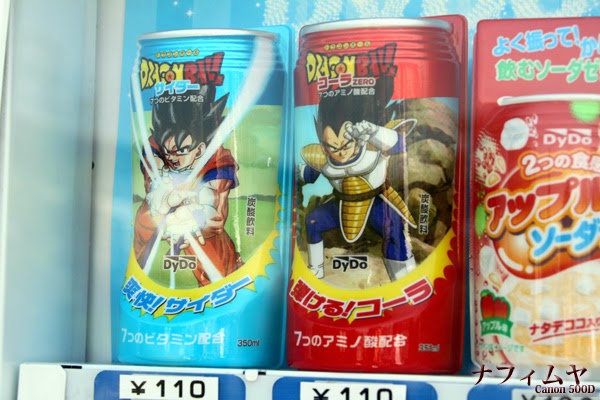
And the moment we got off at Fukakusa Station, there was a bridge we had to cross. And across the bridge, something caught my eyes. A vending machine which sold canned cider and cola drinks with Dragonball designs on them! I was totally not gonna walk away without getting some back as souvenirs. I bought one of each type of drinks and got myself different designs from the ones on display. Too bad I didn't get one with Goku design.

Woohoo Dragonball design canned drinks!

Too bad I didn't get Goku lol.

We walked along the streets for about 5 minutes or so before we reached the JR Inari Station. I had planned for us to alight at Fukakusa Station, which is under the Keihan Main Line, because it was a much cheaper route with just a 5-minute walk to reach Inari Station. The good thing about alighting at Inari Station though is it is right in front of our destination - Fushimi Inari Taisha.

We were greeted with several fox sculptures within the shrine area. Once again, this was a place I had visited back in 2006 and found it a really interesting place to visit, hence I planned it in my itinerary for Dear and Nut. What's so unique about this shrine is the endless number of torii gates throughout the area. You have to see it for yourself. And you have to do some climbing before you can witness such a beautiful sight of these rows of red torii gates disappearing uphill into the mountains.

A black fox welcomes us into Fushimi Inari Taisha.

Plenty of giant red torii gates can be seen here.

A nice spot to take a picture with the beautiful torii gate.

One of the many shrines in the area.

Tug on the strings to ring the bell for good luck.

At a certain point in the trek, some huge rows of torii gates were found, which would lead to shorter but denser rows of torii gates. Each torii gate was actually erected after donations were made to the shrine by some companies or individuals.

Good luck charms.

This is the beginning of the seemingly endless row of torii gates.

A tunnel of torii gates.

You can erect one too by donating these amounts.

More good luck charms in the shape of a fox.

Some ritual going on.

Two rows of torii gates side by side.

To visit the whole of the Fushimi Inari Taisha and all its shrines would take a good amount of climbing. We didn't have much time to climb mountains and therefore we turned back at the area which featured two rows of torii gates side by side. That was around the same place I ended my trek back in 2006 with my three uni friends.

The fox is holding rice in its mouth.

Once back down to the entrance of the shrine, we explored the various shops and restaurants. I bought two bottles of sake as souvenir from one of the sake shops. We walked past two rows of train tracks and decided to take some pictures. Reminded us of some Japanese dramas which always showed such scenes.

Looks like one of the scenes of some Japanese dramas.

Next, we took the JR Line from Inari Station to Shichijo Station. There, we would make our way to our next destination by feet, a UNESCO World Heritage site, Kiyomizu-dera. Along the way, we saw a CoCo ICHIBANYA restaurant. It is part of a famous chain of Japanese curry rice restaurants, which we have quite a few in Singapore as well. As Singaporeans, we all love curry. Therefore even though it was a rather hot day, we still decided to have hot steaming curry rice for lunch lol.

Craving for some curry.

Can't wait to sink our teeth into Japanese curry.

Hashed beef curry.

Smiley-face curry rice designed by Momo and Nut Nut.

After lunch, we walked further down the road and there was this Sanjusangendo, an interestingly-named Buddhist temple. We did not visit the place as there was an entrance fee and so we thought it would be better to spend our time and money at Kiyomizu-dera.

Sanjusangendo

Just a bit further down a bend, we reached the rows of shophouses leading up to the entrance of Kiyomizu-dera. These shops sold all kinds of souvenirs and local delicacies. We continued the climb up the gently-sloping road. Once we reached the entrance to Kiyomizu-dera, plenty of tourists could be seen trying to take pictures with the entrance gate. It is a small temple-like structure, which is actually a gate, but good enough to interest tourists to try to get a good picture with it. Some geishas could be spotted doing their walk around the shrine areas if you were lucky. And indeed we were lucky. I was lucky too back in 2006 as I also spotted some geishas walking around. We got our tickets to Kiyomizu-dera at 300 yen each, and proceeded to explore the various buildings, halls, shrines and other structures inside this vast area.

Main entrance gate to get to Kiyomize-Dera.

Spotted some geishas at the entrance.

Can you lift this heavy staff?

The main attraction was definitely the Main Hall of Kiyomizu-dera. It was built without the use of any nails. Just how smart were the ancient Japanese? It's all evident from their engineering marvel. Other must-sees must be the Otowa waterfall, where tourists could grab water from the three channels of water falling into a pond, believed to grant wishes to the drinker of such water.

We eventually took a break at a small rest-house which sold some jelly dessert. After the short rest and having tried some local dessert, we continued exploring around the area for a short while before leaving the place. Then we visited the rows of shophouses to get some souvenirs and tried some local snacks before making our way back to Osaka.

Many areas to explore in this huge area of Kiyomizu-dera.

The Main Hall of Kiyomizu-dera.

Some cooling jelly dessert.

Having a nice break.

Tourists getting some water, believed to grant the drinker their wishes.

Not a single nail was used in its construction.

The rows of shops to get some local delicacies or souvenirs.

Dear trying out some baked crackers.

Dango anyone?

We were back in Osaka at local time 7:30pm. It was getting dark and we were very hungry by then. We decided to drop by Namba Parks, a shopping mall near Osaka Namba Station. We found a sukiyaki restaurant Nikudokoro Kura and decided to try something more atas. The three of us shared two dinner sets at 4,500 yen each. The whole course consisted of several dishes of appetizers, meat and veggies. We would then grill and barbecue them ourselves. A nice experience but not really worth the hefty price tag.

Namba Parks

Nicely seasoned meat.

Some appetizers to get us started.

And some salad too.

Time to sizzle!

A nice array of meat and veggies.

More meat and veggies.

Nikudokoro Kura

Even though we spent quite a bit on dinner, we still visited Life supermarket to grab some more snacks as it was our last night in Japan. I got my melon milk again to enjoy it once more before we leave Japan the next day.

Night view of Osaka from our hotel room. The iconic Don Quijote building could be seen very clearly.

For a list of the hotels/resorts available for booking in Osaka via Agoda.com, click here.
To make a hotel booking at Swissotel Nankai Osaka Hotel, click here.

Links to our Japan Trip 2013

Day 0
Day 1 - Odaiba
Day 1 - Odaiba Trick Art Museum
Day 2 - Tokyo DisneySea
Day 3 - Shibuya
Day 4 - Tokyo Imperial Palace, Yokohama, Asakusa
Day 5 - Hakone
Day 6 - Osaka
Day 8 - Nara
Souvenirs

How I Planned My Japan Trip Itinerary

Japan Trip Itinerary Planning and Preparations

Saturday, June 1, 2013

Travel Blog: Japan Trip Itinerary Planning and Preparations, 日本之旅准备过程

I have decided to include this post because it takes a tremendous amount of time to plan and prepare for a free-and-easy trip, and precisely why it takes so long is because of how readily available the information is, especially for a country like Japan, where they have done an exceptional job of marketing themselves. So much information is available online that it's really good to know what you're gonna get, before plunging straight into the trip and then realizing that you could have had more information at hand to prevent certain unexpected things from happening. Also, we had spent about one month's time to gather information, book all the necessary accommodation, air tickets, planning, which trains and routes to take throughout our 8 days in Japan. Therefore I felt that we should share our experiences which could potentially help other travelers have an easier time planning a trip to Japan.

Air Tickets

This is more for Singaporeans. We got our tickets from Chan Brothers Travel, which had a promotion for the non-stop return tickets to Japan with Singapore Airlines Airbus 330-300. It was $370 for the tickets, plus taxes and surcharges at $389, for a total of $759. Normally it would cost around $1000 or more. Quite a steal, I would say. All prices in this post (in the whole of this blog as well, unless otherwise stated) are in SGD.

Alternatively, some of the budget airlines provide cheaper means of flying to Japan. Do look out for special promotions, which could mean cheaper deals to bring you to the land of the rising sun!

Accommodation

The deciding factor greatly varies with the number of people sharing the room, as well as the places you wish to visit, and of course, your budget. Other things to consider when choosing a hotel are the facilities and services it provides, such as free Wi-fi in the room or only Wi-fi at the lobby area, or paid Wi-fi etc, in-door onsens (hotsprings), or close proximity to convenience stores, local subway stations or places of interest, any free or paid shuttle services to places of interest, airport transfers etc. With so many factors to consider, choose the most important features that you need from a hotel of your choice and within your budget.

We made all our bookings from Agoda.com. Most importantly why we chose Agoda was because of the various promotions they have with some of the hotels listed, as well as the user-friendly interface.

Next, based on our list of places which we want to visit, we then chose the hotels which are the most convenient. You wouldn't want to have to travel a long distance back to the hotel after a long day at the theme park or lugging huge shopping bags on your way back, would you? Therefore our choice of hotels is closely dependent on the places we want to visit.

Accommodation in Tokyo

We had planned to go to Tokyo Disneyland or Tokyo DisneySea, therefore it's definitely a good idea to choose a hotel close to it. We decided to choose Sheraton Grande Tokyo Bay Hotel. It is a 5-star hotel and takes less than 10-minutes of monorail ride on the Disney Resort Line, which is a railway that only serves four stations around the whole Tokyo Disney Resort, to reach Disneyland or DisneySea. There are other hotels to choose from as well, and prices are pretty similar, so it's really up to your liking and room availability. One other benefit of choosing those hotels near Tokyo Disney Resort is the cheaper rates compared to those in the main Tokyo city areas such as Shibuya, etc. Do a comparison yourself. It's definitely a good idea to choose any of the three Disney-branded hotels or the six official hotels (Sheraton Grande Tokyo Bay Hotel being one of them) if you wish to spend a day or two at the resort.

Another thing you don't have to worry is that even though Sheraton Grande is not listed as a Disney-branded hotel, you will still be able to see plenty of Disney-related decorations, shops etc. in the hotel. I have not been to the other hotels but I believe they will also include Disney-related stuff in the hotel one way or another.


For a list of the hotels available for booking in Tokyo, click here.

To make a hotel booking at any of the three Disney-branded hotels,
visit the respective Disney hotel sites:

To make a hotel booking at the some of the other non-Disney hotels near Tokyo Disney Resort via Agoda.com, click the following links:

Accommodation in Shinjuku

There are plenty of hotels to choose from at Shinjuku area, so why did we choose Shinjuku Washington Hotel? Most of our choices depend on whether there were rooms for 3 pax, since I was travelling with my dear and her sis. Therefore all the hotels we chose had rooms for 3 pax. Besides that, the reason this hotel was chosen was because of its close proximity to Shinjuku Station, where many railway lines were available. Something we realized after we reached Shinjuku Station and trying to find our way to the hotel was that there actually is an underground walkway which links all the way to the hotel. No worries about rain or shine. The only drawback is it's quite a long walk to the hotel from the station, while pulling our luggage along. But it's definitely easier than pulling across streets or pavements, just that there's nothing to see along the way.

To make a hotel booking at Shinjuku Washington Hotel, click here.


Accommodation in Hakone

There are plenty of hotels to choose from. But we chose Hakone Hotel for it being conveniently located right next to the Hakonemachi Port, which is one of three ports to board the Hakone Sightseeing Cruise. We had planned to get the Hakone Freepass which allows one to travel around Hakone using the various transportation services available in the area. More on that later.

To make a hotel booking at Hakone Hotel, click here.


Accommodation in Osaka

For the last hotel in our 8-day trip, we chose Swissotel Nankai Osaka. There are other cheaper hotels in the area but are quite far from the subway station. It was our most expensive hotel for the whole trip, but I believe it was a really good choice because it sort of sits right on top of the Osaka Nanba station. Well worth the money for the convenience. It is also in the same building as Osaka Takashimaya, and all around you are shopping malls, banks etc. I would choose this hotel again if I have the budget simply because of the convenience if you wish to travel to other parts of Osaka. There is also Nankai Railway's very relaxing and comfortable Limited Express Rapi:t which is literally at the doorstep of the hotel, which takes us to Kansai International Airport in about 38 minutes. More on that later in my posts.

To make a hotel booking at Swissotel Nankai Osaka Hotel, click here.


Transportation

There are tonnes of day passes, discount passes for all types of transportation services in Japan. Especially if you're a local, these passes save you tonnes of money. For tourists like us, there are also many such passes which we can utilize to save on our transportation expenses.

For our itinerary, there was no need to get any advance tickets as all the tickets were conveniently available on our day of travel.

From my initial research for the transportation passes we may need to get, here are some of them which are useful:


For starters, if you plan to travel a lot along the JR lines via Shinkansen, it's a must that you buy the pass in advance in your own country. Due to our itinerary, we will not be traveling much on the Shinkansens and therefore we did not get the pass. Only choose to get the JR Pass if you plan to utilize it more than enough to cover the cost of the pass itself.
 
 
Tokyo Combination Ticket (¥1580 > ¥1600 for adults, ¥800 for children)

This ticket allows unlimited rides on all lines of Tokyo Metro, Toei Subway, Toden, Tokyo metropolitan buses (except for buses with fixed seats, etc.), all sections of Nippori/Toneri Liners, as well as all lines of JR within Tokyo ward for one day stated in valid period.

Check out the various tickets available in the same page as well, according to your itinerary.


Yurikamome (Adults ¥800 > ¥820, Children ¥400 > ¥410)

This ticket allows traveling around the various attractions within the Odaiba area.


Hakone Freepass (From Shinjuku ¥5000 > ¥6100 for adults, ¥1100 for children)

This ticket is definitely a must-buy if you wish to visit Hakone. Especially so if you're traveling from outside Hakone like Shinjuku, Machida or Odawara. This is because you will most probably want to embark on a trip around the whole of the Hakone area via the various transportation services available, which includes the following:

1. Hakone Tozan Train
2. Hakone Tozan Cable Car
3. Hakone Ropeway
4. Hakone Sightseeing Cruise
5. Hakone Tozan Bus / "KANKO SHISETSU-MEGURI"Bus (Tourist-facilities Round Bus)
6. Odakyu Hakone Highway Bus (Designated Areas)
7. Numazu Tozan Tokai Bus (Designated Areas)


I can't stress enough on the benefits of getting this pass. Unless of course you wish to take the sightseeing cruise only, or you're not intending to ascend the various mountains to visit the various tourist attractions, onsens etc.


Planning Transportation Around Japan

Planning a trip around Japan is an easy process thanks to their wonderful transport system and readily available travel schedules of every single train, bus, ferry etc. The following two very useful tools helped me greatly in planning my itinerary, making sure I won't get lost when I am physically in Japan. (Then again, we did get kinda lost due to the overwhelming amount of information available everywhere we went.)

Hyperdia

This website is definitely the must-go if you want to have an accurate and easy time planning any trips around Japan. I planned all my routes and transportation using this website.

Google Maps

Besides Hyperdia, Google Maps played an important role of allowing me to plan which routes are close to which hotels, which hotels are closest to train stations and tourist attractions etc.


Mobile Wi-Fi (MiFi)

What could be more convenient than having a portable Wi-Fi wherever you go, during an overseas trip? After making some comparisons, we have chosen the service of Japan Wireless, getting the 42Mbps Mifi for 8 days (¥5200) plus shipping (¥500), all tax included. This comes up to about $75 for 8 days, which is less than $10 a day. It also comes with free spare battery. You can opt for additional insurance of ¥500. There are also the 21Mbps and 75Mbps versions. There are other such service providers available but we have decided to choose this for its lower prices, and excellent coverage (98% on e-mobile network, according to their website). I would say I could not remember a time not having any coverage. How it works is really simple, just follow the 7 steps shown on their main page.

It's really convenient to have internet access on our smart phones as we can then check for information on directions, tourist attractions, transportation etc. Good for video-calling with our families as well. I would suggest getting it because you'll never know when you need to search for something on the internet. This small device that fits snugly into your pockets will surely come in handy. Another advantage of getting a MiFi, especially when traveling in a group, is everyone in the group can share just one MiFi. It would certainly be more economical than getting a SIM card each.

May 2019 update: Prices have increased substantially. Check out the latest prices on the Japan Wireless page. Included below is a table of the rates. I have calculated the rate per day for convenience.

No. of days Rate (Japanese yen)
inclusive of tax
Rate/day
1 4266 4266
2 4266 2133
3 4698 1566
4 5022 1256
5 5346 1069
6 5670 945
7 5994 856
8 6318 790
9 6642 738
10 6966 697
11 7290 663
12 7614 635
13 7938 611
14 8262 590
15 8586 572
16 8910 557
17 9234 543
18 9558 531
19 9882 520
20 10206 510
21 10530 501
22 10854 493
23 11178 486
24 11502 479
25 11826 473
26 12150 467
27 12474 462
28 12798 457
29 13122 452
30 13446 448


Other Resources

There are many websites that provide tonnes of information to prepare for a safe and easy trip in Japan. These are the few that I find pretty useful.

japan-guide.com
76 Things To Do In Tokyo


Conclusion

An ill-planned itinerary will bring in unforeseen circumstances you would not wish to happen. Therefore, plan your itinerary ahead so that you don't have to worry about where and when to find the next train or how to get from point A to point B, or miss out on deals and save on your travel expenses.
I'm sure I might not have the best itinerary planned. There could be better deals out there which I might not have come across during my research and preparations for the trip. Readers, please drop some comments to share with me and all other readers if you find something more useful. I'm definitely going back to Japan again!

Finally, if you find this post useful, do share it with your family and friends. =)

Note: All ticket prices stated in this post are accurate as of April 2023.